Thursday, July 24, 2014

Easy coconut cookies

There are lots of different ways to make cocadas, or coconut cookies. This is really easy. All you need is a 14 oz. bag of shredded coconut, a 14 oz. can of sweetened condensed milk and a lime.


Pour the shredded coconut in a large mixing bowl. Add the zest of a lime.


Use the juice from the whole lime.


I used the whole 14 oz can of condensed milk. It creates a thick mixture, but isn't dry.


Mix the ingredients. Use an ice cream scoop or two spoons to create mounds of the coconut mixture so that they are all the same size.

Place the mounds on a pan lined with parchment paper. Using a 1.75 inch scoop, I created 21 cocadas.


Bake at 350 degrees F. for 15 - 18 minutes. Watch them so that they don't get too brown. The bottoms will caramelize and the cookie will be soft and chewy. Let them cool completely before eating.

I turned one over so you could see how it will caramelize, yummy!


Hope you enjoy baking these!


Monday, July 14, 2014

Spent Grain Bread from beer 'left-overs'

If you like a hearty, nutty whole grain bread, you need to try making bread using the spent grains from brewing beer. Local breweries will give you the spent grains which many use for farm animal feed or composting and bread making. Not having a farm, I will use my spent grains to experiment with bread recipes.

The first spent grains I used were from Jade, a beer produced at Foothills Brewery in Winston-Salem, North Carolina.

I dried the grain in the oven at 170 F and ground it up a bit in the food processor. It doesn't quite grind down to a flour consistency, but makes a fine grain which is great for the bread.

The recipe shows measurements in ounces and grams. A digital scale is useful for exact measurements.


 Then I make the spent grain bread.

Once the grains are dried and ground, they can be stored in the freezer for future batches. Tomas Rohner's directions for the spent grain sesame bread (see link above) are easy to follow and not technically difficult. It just takes time for the pre-ferment, 12-18 hours. The steps are shown using a bread machine, but I just mix in the Kitchen Aide and knead by hand.

Now I have another batch of spent grain from Natty Greene's Brewery in Greensboro, North Carolina. It is a pale ale spent grain. I also got a cup of the wort.


Doing a little research on the internet I found a recipe using the wet spent grain from the American Homebrewers Association and advice on substituting some wort for part of the water in the recipe. This was easy to mix in a large stainless steel bowl. I kneaded it, adding flour until it was no longer sticky, just a little tacky, and put it in the cleaned, oiled bowl and covered it to rise.


I made the bread a little differently using the second batch of bread from the Natty Greene's spent grain. Using the recipe from the American Homebrewers Association (see link in previous paragraph)
I used 1 cup of whole wheat flour in addition to almost 4 cups of bread flour and used honey instead of sugar. Just use 1 teaspoon of the honey to activate the yeast and put the rest in the bowl with the other ingredients. Instead of 3 cups of wet spent grain, I used 1 packed cup of wet spent grain that had been ground up in the food processor.  This wet spent grain recipe doesn't require a long preferment like the recipe from Rohner mentioned above. You can mix it in the morning and bake in the early afternoon.


The half sheet pan in the back has spent grain that has been dried in the oven, 170 degrees, stir it occasionally until it is dry and leave the oven door open slightly so that moisture can escape.


The loaf to the left has risen, been misted with water and slit with a serrated knife.


It has a light texture and browns nicely in the oven.


All ready for that tomato sandwich, it is summer after all!


Even if there isn't a brewery near you, so many people brew craft beer at home, it may be possible to find a local source for spent grain.

Happy Baking!


Tuesday, July 1, 2014

Snowy owls - another live cam

The snowy owls have a live animal cam too! Check out this Journey North link to see these owls and many more live animal cams! With 24 hours of daylight above the arctic circle there is lots of time to view them!

Monday, June 30, 2014

Puffins, live!

Remember the knitted puffin from the post on June 4th?

Go to this link on the Journey North website and you will see lots of puffins! Puffins on Seal Island in Maine. The babies are hatching and there are lots of video clips of the puffins.

Sunday, June 29, 2014

Challah and sourdough - two different kinds of yummy!

Challah bread is yellow, soft and delicious. It makes great french toast and bread pudding. The recipe from Peter Reinhart's book makes 3 large braided loaves and if you put the three parts in separate containers to ferment, you can make the loaves on consecutive days. His recipe is easy to do, just mix everything together, put it in a container to ferment in the refrigerator and shape and bake the loaves within 4 days. It really gives you flexibility in your schedule for baking. His book can probably be found at the public library and is also available on line as a PDF file: Peter Reinhart's artisan breads every day.

The eggs I used for the challah loaves are Marans. They are deep caramel brown on the outside with darker brown spots on the shells. The chickens that produce them originated in Marans, France. There is a local farmer who has the Marans chickens and there are usually several of these eggs in the cartons.


The recipe measures the quantities for the ingredients in grams, so when I separate the eggs to use them, I pour the yolks in a bowl and keep opening eggs until I get to the required amount. This is usually between 8 and 10 yolks. No wonder the bread is so yellow!


A egg wash with a whole egg gives the outer crust a deep golden color when baked. This dough is a dream to work with. The directions in Mr. Reinhart's book are easy to follow and the slow fermentation in the refrigerator makes the scheduling of your baking time easy.


Today I tried Dan Leader's Quintessential French Sourdough, Pain au levain. This bread begins with a stiff dough levain. The directions for making this are in the book. It is an easy sourdough to use because the levain fits in a quart jar thus not taking up much space. This bread is made with the levain, bread flour,  and smaller amounts of whole wheat flour and rye flour and salt. The levain is refreshed overnight with water and flour and the fermenting and proofing happen on the next day. I use a Kitchen Aid mixer for most of the kneading unless the recipe calls for a large amount of flour. This recipe is easy to knead in the mixer. The dough was shaped into two bâtards. The taste is wonderful! The crust is crisp due to the placement of ice cubes in a pan below the baking stone. This creates steam during the first minutes of baking.  This recipe is definitely worth making. Mr. Leader's directions are easy to follow. His book Local Breads is a must have for your baking library. If you buy the 2007 edition like I did, go to this link to find some corrections in a PDF file.

Here you can see the inside of the French Sourdough. Wish you could taste it too!


Like I said in the title of this post:

Two

Kinds

of

Yummy!


Happy Baking!

Thursday, June 19, 2014

On boys, bread and a new bird

On a recent evening I had the rare treat of having dinner with my three boys. Ok, one is my husband, still just a boy at heart and the other two boys are my sons Josh, 37, and Jon, 31. Jon had come down from Baltimore to play a concert with his band, The Leeves, and Josh happened to be in town and picked him up at the train. We all settled down for a quick meal at our favorite sandwich shop, First Carolina Deli. 


Now about the bread. Dan Leader has a wonderful book, Local Breads, that I have really enjoyed exploring. He has recipes for a variety of kinds of sourdoughs and the stiff dough levain was used to make this Auvergne Crown. His book was available at the public library and I checked it out several times. Finally bought on on Amazon when I was not sure I could keep the pages clean in the borrowed book!


Another bread baking resource that I love is Peter Reinhart's Artisan Breads Every Day. This entire book is available as a PDF file on this link.

Finally birds. A friend suggested that I make a papagayo, otherwise known as a red macaw. 
Here is a photo of a real papagayo.
.
Here is the one I knitted. Chris's basic bird body pattern is easily adapted to a wide variety of animal creations! I used the puffin body from Chris de Longpré's book 52 Timeless Toys to Knit.  The wings are 2x2 rib knit and the tail feathers are i-cord. The gray feet are also i-cord but have pipe cleaners inserted into the i-cord. Facial details are satin stitch and the beak is an experiment in increases, decreases and stuffing!

Wishing you happy days as summer approaches!

Wednesday, June 4, 2014

Knit your own zoo!

Knitting animals is a lot of fun especially since I have a new source of inspiration in Chris de Longpré's book, 52 Timeless Toys to Knit. Tina Fier has them at Gate City Yarns in Greensboro. She brought one back from a recent buying trip for the shop and we have been oohing and aahing over the cute animals ever since.

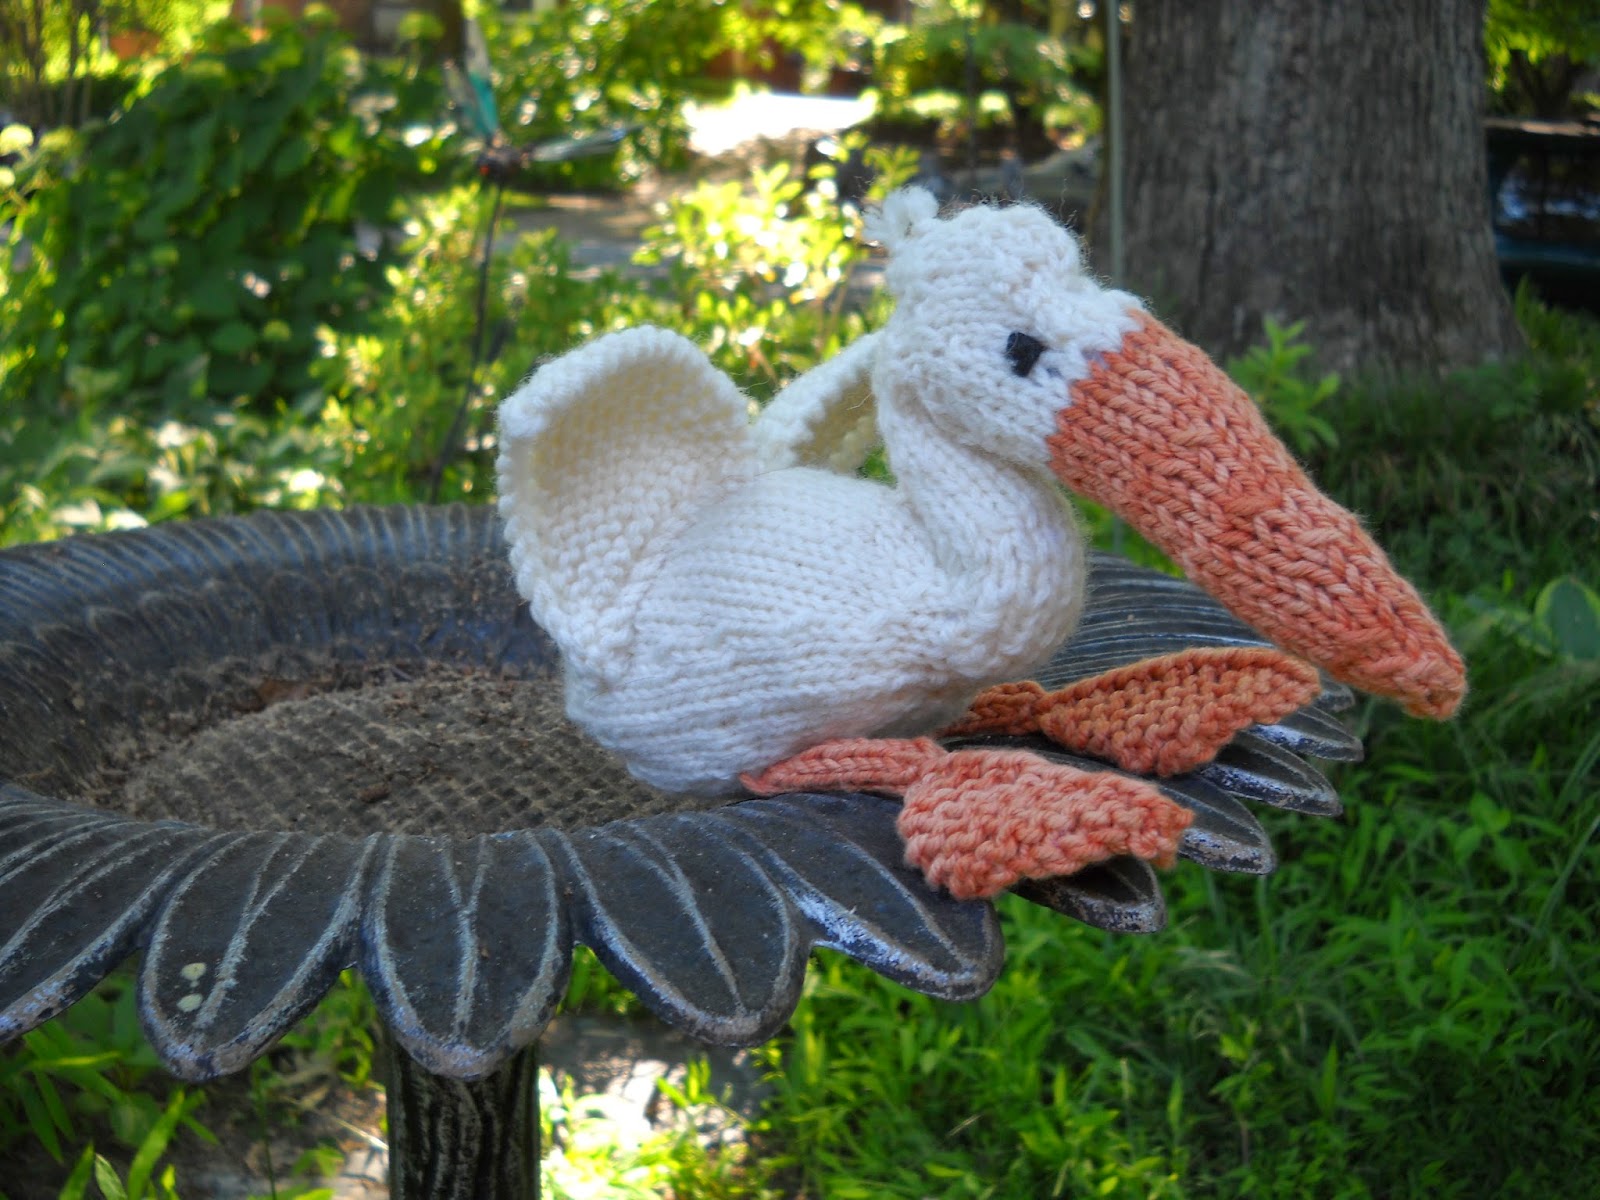
The first animal isn't actually in the book, except as pieces of various other animals. I had searched for a pattern for a pelican only to find crochet patterns and I don't know how to crochet. After collaborating with Tina and Timmie, knitting gurus, we decided on the flamingo body, and wings and feet from the blue footed booby found in the book. The beak was kind of extemporaneous. He landed rather clumsily in the bird bath in the front yard!


Next was the puffin. Following this pattern was easy. His black wings and cap are sewn on after knitting the body. 


The lizard is knit from wonderfully soft EZC Nautika yarn from Gate City Yarns. The collared lizard really does have these beautiful blue and greens colors on his body and gold head. Green scales on his back are done in duplicate stitch.


The turtle is the most recent addition to the zoo. The brown hand-spun wool for his shell is from Rising Meadow Farm in Liberty. Ever year I buy wool there, right off of the sheep! This rich brown is the natural color of the sheep. Tina from Gate City Yarns picked out the green for his head, feet and tail. 


There is also a lighter green for his plastron (that's biologist speak for the bottom shell). On the underside the shell was attached so that openings were left to tuck in the appendages. His head, feet and tail can be pushed back into his shell, protecting him from some predators! 


Three animals from the book plus the pelican have been a source of great amusement and satisfaction. It doesn't take long to complete an animal and they do bring a smile to your face!

Now I have to decide who's next...beluga, frog, platypus?? They are all so cute!